
01.產品介紹
本產品為交流充電樁,適用於住宅及商業場景,具備完善的電氣保護功能與人機操作介面,支援安全高效的電動車充電,符合國際標準要求。

-
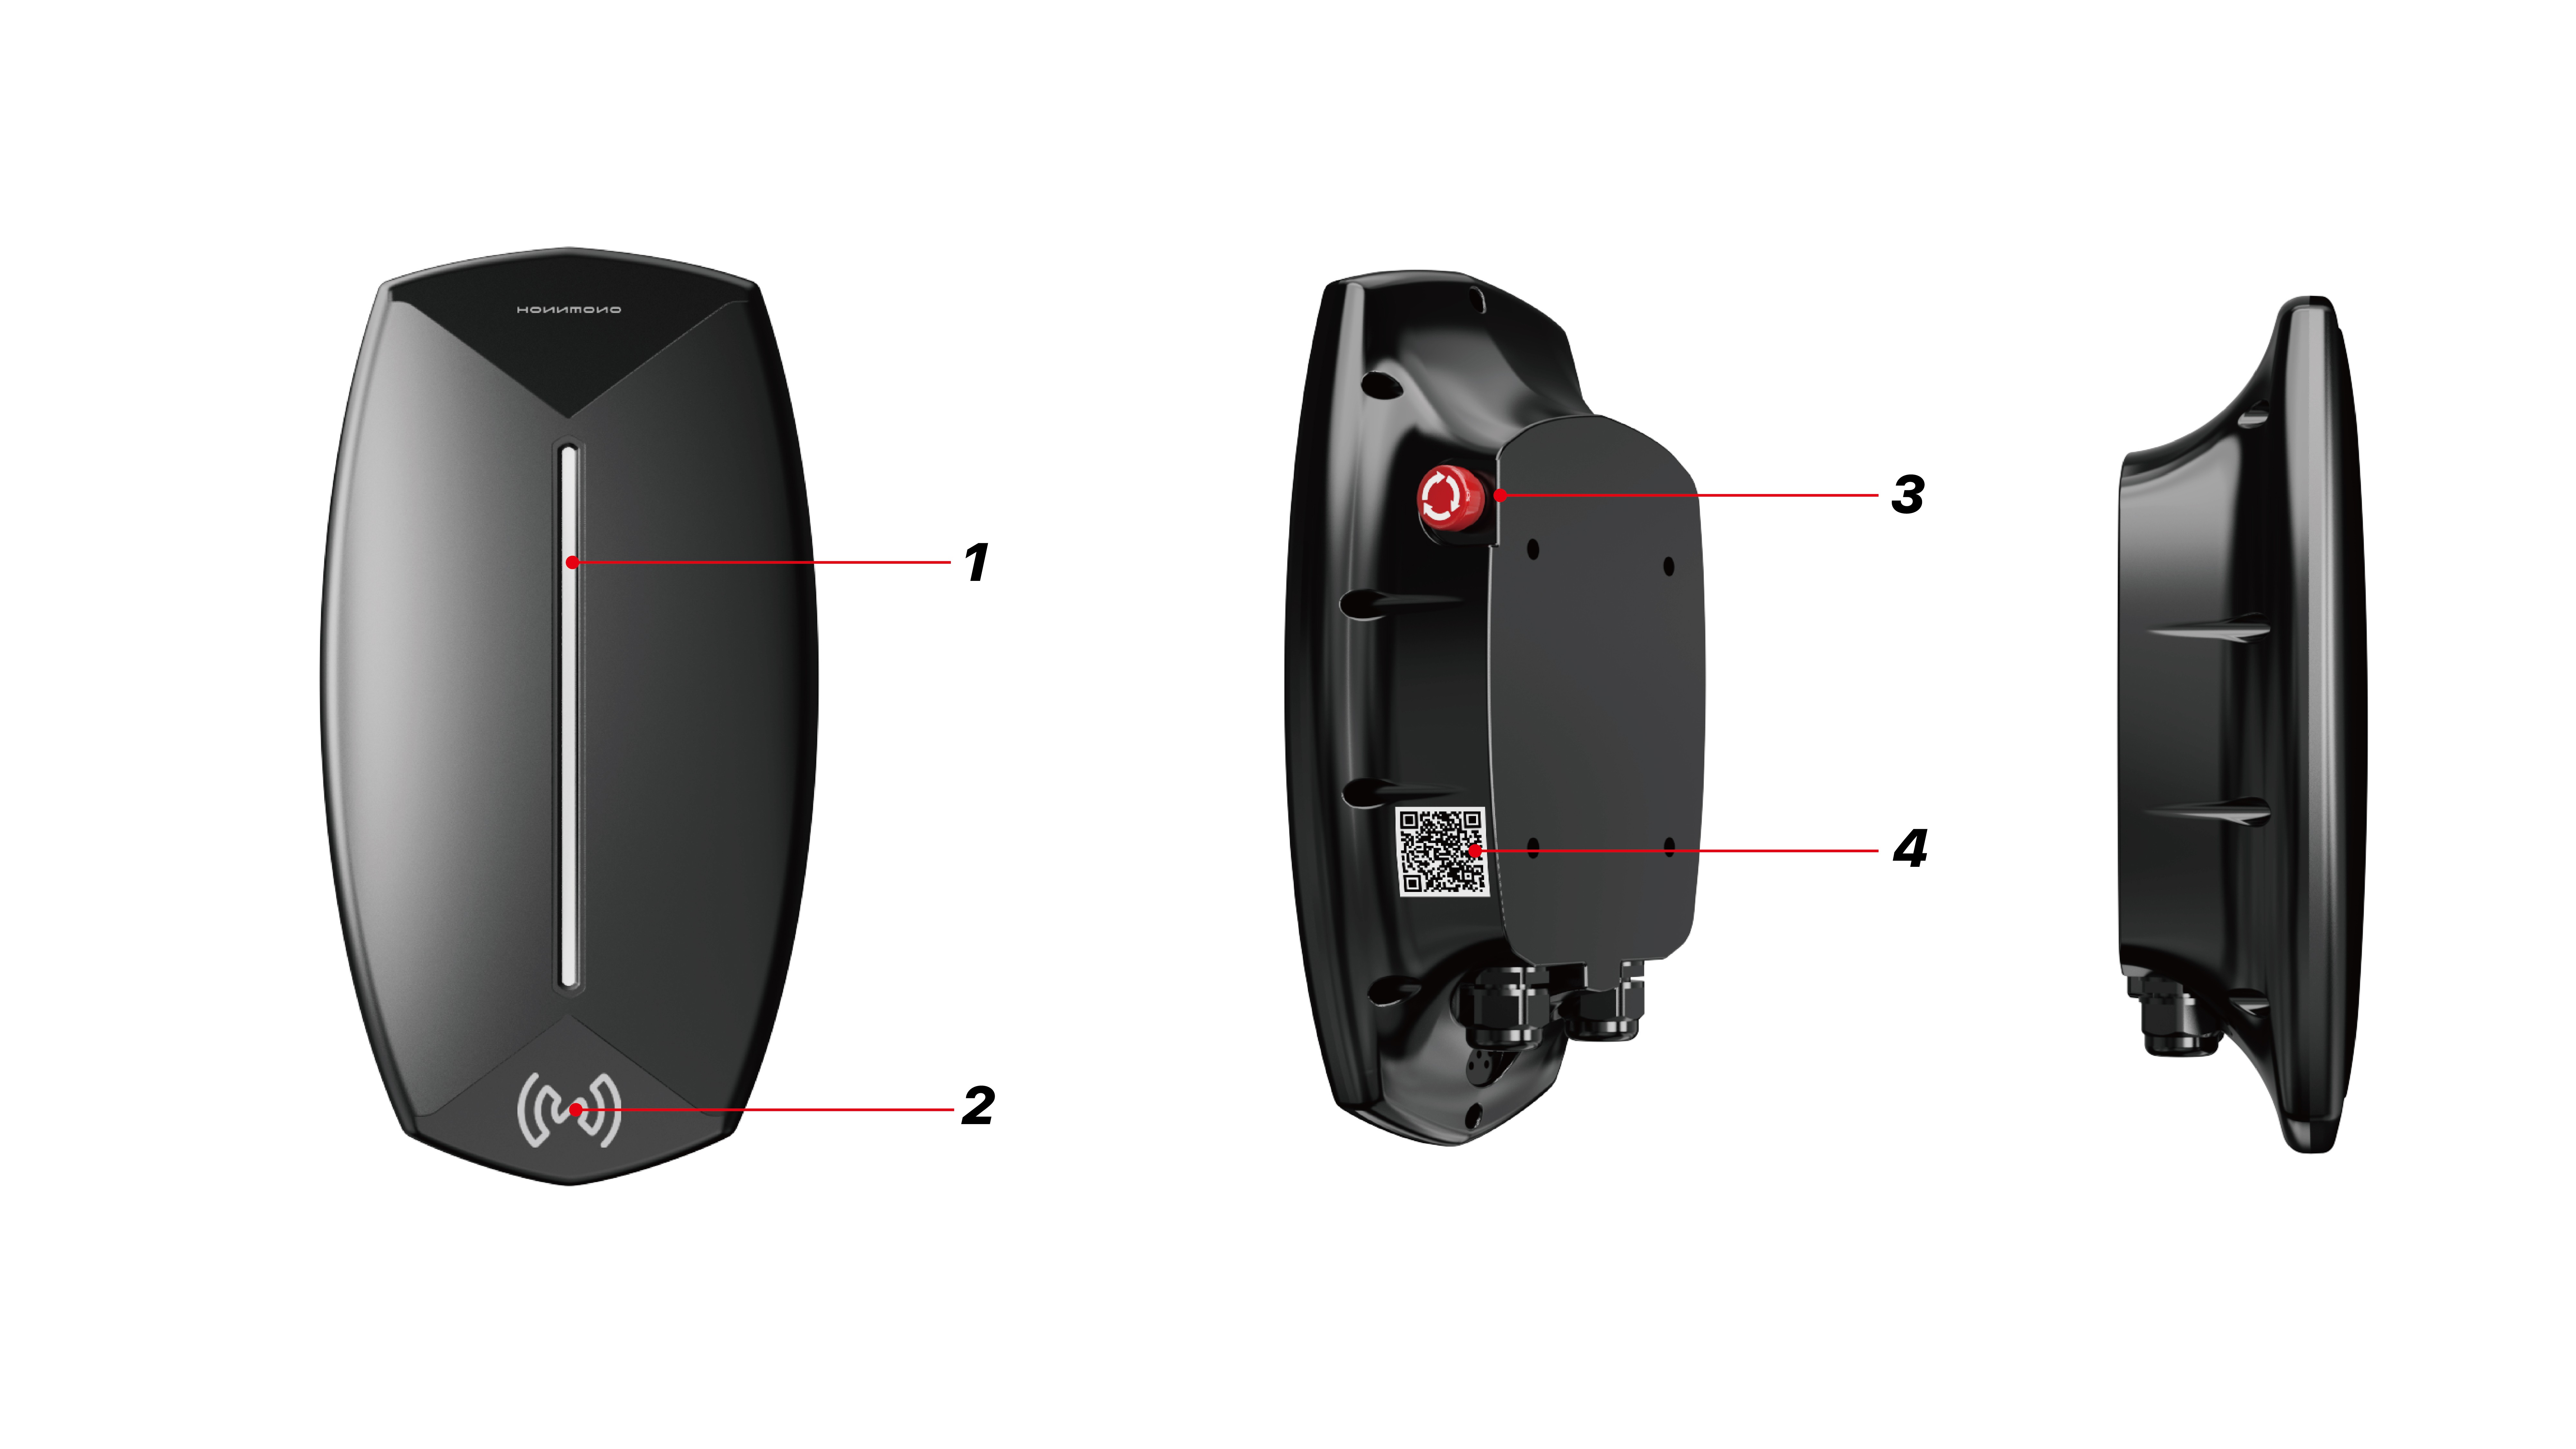
指示燈帶
-
刷卡區域
-
急停按鈕
-
產品二維碼
產品規格 |
|
|---|---|
|
輸入電壓 |
230V AC ±10% |
|
工作溫度(攝氏) |
-25°C ~55°C |
|
防護等級 |
IP54(室內/戶外皆可) |
|
保護類型 |
I 類 |
|
通訊協議(選配) |
OCPP 1.6J |
|
安裝方式 |
壁掛 / 立柱選配 |
|
接地保護 |
未接地線或接地不良時觸發告警保護 |
|
過流保護 |
負載大於額定電流 110% 觸發告警保護 |
|
繼電粘連保護 |
待機時繼電器粘連觸發告警保護 |
|
過溫保護 |
溫度>100℃觸發告警保護 |
|
過壓保護 |
>275V 觸發告警保護 |
|
欠壓保護 |
<100V 觸發告警保護 |
|
B型漏電保護 |
漏電 DC>6mA, AC>30mA,觸發告警保護, 觸發時間<100ms |
|
急停 |
開啟急停觸發告警保護,觸發時間<100mS |
02.安裝說明

安裝前應準備好相應的固定螺栓。建議使用4個Ø6*80膨脹螺栓。
-
取出包裝中的金屬掛板,並確定安裝位置(建議高度:1400mm)。
-
確定安裝位置後,使用冲擊電鑽打孔,然後根據方向指示將牆架用Ø6膨脹螺絲安裝在牆上。
-
預先安裝隨產品附帶的四個M6*15六角頭螺絲到充電牆盒的相應位置。注意螺絲不應緊固,應保留2-3mm的間隙。
-
將充電牆盒掛在牆架上,並從側面用六角扳手鎖緊四個M6*15六角頭螺絲。
-
安裝完成後,打開電源,等待充電牆盒的指示燈亮起,然後根據使用手冊執行充電程序,以確保充電牆盒的正常使用。
不同狀態下的燈帶狀態 |
|
|---|---|
|
待機狀態 |
藍燈常亮 |
|
準備充電狀態 |
綠燈常亮 |
|
充電狀態 |
綠燈閃爍 |
|
充電完成狀態 |
綠燈常亮 |
|
急停故障 |
紅燈常亮 |
|
未接地故障 |
紅燈每5s閃爍2次 |
|
CP 錯誤故障 |
紅燈每5s閃爍3次 |
|
過流故障 |
紅燈每5S閃爍4次 |
|
過壓故障 |
紅燈每5s閃爍5次 |
|
欠壓故障 |
紅燈每5s閃爍6次 |
|
繼電器粘連故障 |
紅燈每5s閃爍7次 |
|
漏電故障 |
紅燈每5s閃爍8次 |
|
過溫故障 |
紅燈每5s閃爍9次 |
03.APP綁定流程

-
掃描二維碼下載Honnmono App。下載完成後打開App並註冊一個帳戶。
-
註冊完成返回主頁,點擊主頁右上角的掃碼圖標,對準產品右側面二維碼進行掃描,以此鏈接產品。
04.充電使用教程
RFID卡使用
要啟動充電程式,請將充電器連接至車輛,並將鎖匙卡放在充電樁的 RFlD 傳感器上0.5 秒鐘。
要停止充電過程,請將鎖匙卡放在充電樁的 RFlD 上 0.5 秒鐘。
APP使用

-
綁定完成後,打開HONNMONO APP,進入首頁,下滑找到“家用充電樁”板塊進入設備,以此開始充電。
-
點擊開啟圖標從而開始充電。
-
點擊關閉圖標從而停止充電。
充電樁預設&設置(APP)

點擊左側設置圖標,即可進入充電樁設置頁面。點擊右側日曆圖標,即可進入充電樁預設頁面。
05.恢復出廠設置
待機狀態下按下急停按鈕,隨後關機後再開機。此時充電樁會發出警報聲,直到警報聲停止後按起急停按鈕,恢復出廠設定完成。
06.使用注意事項
1. 本產品必須由接受過培訓並且有資格操作電氣系統的人員安裝。安裝輸入空氣開關必須選擇大於設備的額定電流1.5倍以上的空氣開關,並且電源地線必須可靠接地。
2. 使用過程中請嚴格遵循設計參數及使用條件,不得超過本用戶手冊中的閾值,否則有可能損壞設備。
3. 請不要改變電氣部件的規格,不要改動內部線路或嫁接其它線路。
4. 將充電樁安裝好以後,設備接通電源後如充電樁無法正常啟動,請檢查電源接線是否正確。
5. 設備具有有限的防塵、防水能力,使用過程要注意防靜電、防潮、防水等,如設備已進水應立即斷電停止使用。
6. 請不要在充電過程中插撥充電槍,以免對充電樁及汽車造成不可逆的損壞。
07.保修條例
1. 本產品自購買日起,提供為期一年的免費保固服務。 (人為原因造成的損壞除外)
2. 使用前請詳細閱讀產品說明書,以免誤操作。
3. 因使用不當、產品過保修期、人為及自然損耗等因素造成產品損壞,不屬於免費保修範圍,本公司對此類維修將酌情收取維修費用。
4. 聯絡方式:support@honnmono.com.hk
01. Product Introduction
This product is an AC charging pile, suitable for residential and commercial scenarios, equipped with complete electrical protection functions and human-machine operation interface, supporting safe and efficient electric vehicle charging, in compliance with international standards.
-
Indicator Light Strip
-
Card Reading Area
-
Emergency Stop Button
-
Product QR Code
Product Specifications |
|
|---|---|
|
Input Voltage |
230V AC ±10% |
|
Operating Temperature (Celsius) |
-25°C ~55°C |
|
Protection Level |
IP54 (suitable for indoor/outdoor) |
|
Protection Type |
Type I |
|
Communication Protocol (optional) |
OCPP 1.6J |
|
Installation Method |
Wall-mounted / Column selection |
|
Ground Protection |
Triggers alarm protection when the ground line is not connected or poorly grounded |
|
Overcurrent Protection |
Triggers alarm protection when the load exceeds 110% of the rated current |
|
Relay Sticking Protection |
Triggers alarm protection when the relay sticks during standby |
|
Overtemperature Protection |
Triggers alarm protection when the temperature >100℃ |
|
Overvoltage Protection |
Triggers alarm protection when >275V |
|
Undervoltage Protection |
Triggers alarm protection when <100V
|
|
B-type Leakage Protection |
Triggers alarm protection for leakage DC >6mA, AC >30mA, Trigger time <100ms
|
|
Emergency Stop |
Opens emergency stop triggering alarm protection, trigger time <100mS
|
02. Installation Instructions

Before installation, prepare the corresponding fixing bolts. It is recommended to use 4 Ø6*80 expansion bolts.
-
Remove the metal mounting plate from the packaging and determine the installation position (recommended height: 1400mm).
-
After determining the installation position, use an impact drill to drill holes, and then install the wall bracket on the wall with Ø6 expansion screws according to the directional indication.
-
Pre-install the four M6*15 hex screws included with the product into the corresponding positions of the charging wall box. Note that the screws should not be tightened, leaving a gap of 2-3mm.
-
Hang the charging wall box on the wall bracket and tighten the four M6*15 hex screws from the side with a hex wrench.
-
After installation, turn on the power, wait for the indicator light on the charging wall box to light up, and then follow the user manual to execute the charging procedure to ensure the normal use of the charging wall box.
Status of the Indicator Light Strip under Different Conditions |
|
|---|---|
|
Standby Status |
Blue Light Always On |
|
Ready to Charge Status |
Green Light Always On |
|
Charging Status |
Green Light Flashing |
|
Charging Complete Status |
Green Light Always On |
|
Emergency Stop Fault |
Red Light Always On |
|
Ungrounded Fault |
Red Light Flashes 2 times every 5s |
|
CP Error Fault |
Red Light Flashes 3 times every 5s |
|
Overcurrent Fault |
Red Light Flashes 4 times every 5s |
|
Overvoltage Fault |
Red Light Flashes 5 times every 5s |
|
Undervoltage Fault |
Red Light Flashes 6 times every 5s |
|
Relay Sticking Fault |
Red Light Flashes 7 times every 5s |
|
Leakage Fault |
Red Light Flashes 8 times every 5s |
|
Overtemperature Fault |
Red Light Flashes 9 times every 5s |
03. APP Binding Process

-
Scan the QR code to download the Honnmono App. After the download is complete, open the App and register an account.
-
After registration, return to the homepage, tap the scanning icon at the top right of the homepage, and scan the QR code on the right side of the product to link to the product.
04.Charging Usage Tutorial
Using RFID Card
To start the charging process, connect the charger to the vehicle and place the key card on the charging pile's RFID sensor for 0.5 seconds.
To stop the charging process, place the key card on the charging pile's RFID for 0.5 seconds.
Using APP

-
After binding is complete, open the HONNMONO APP, go to the homepage, scroll down to find the "Home Charging Pile" section to access the device, and start charging.
-
Click the on icon to start charging.
-
Click the off icon to stop charging.
Charging Pile Defaults & Settings (APP)
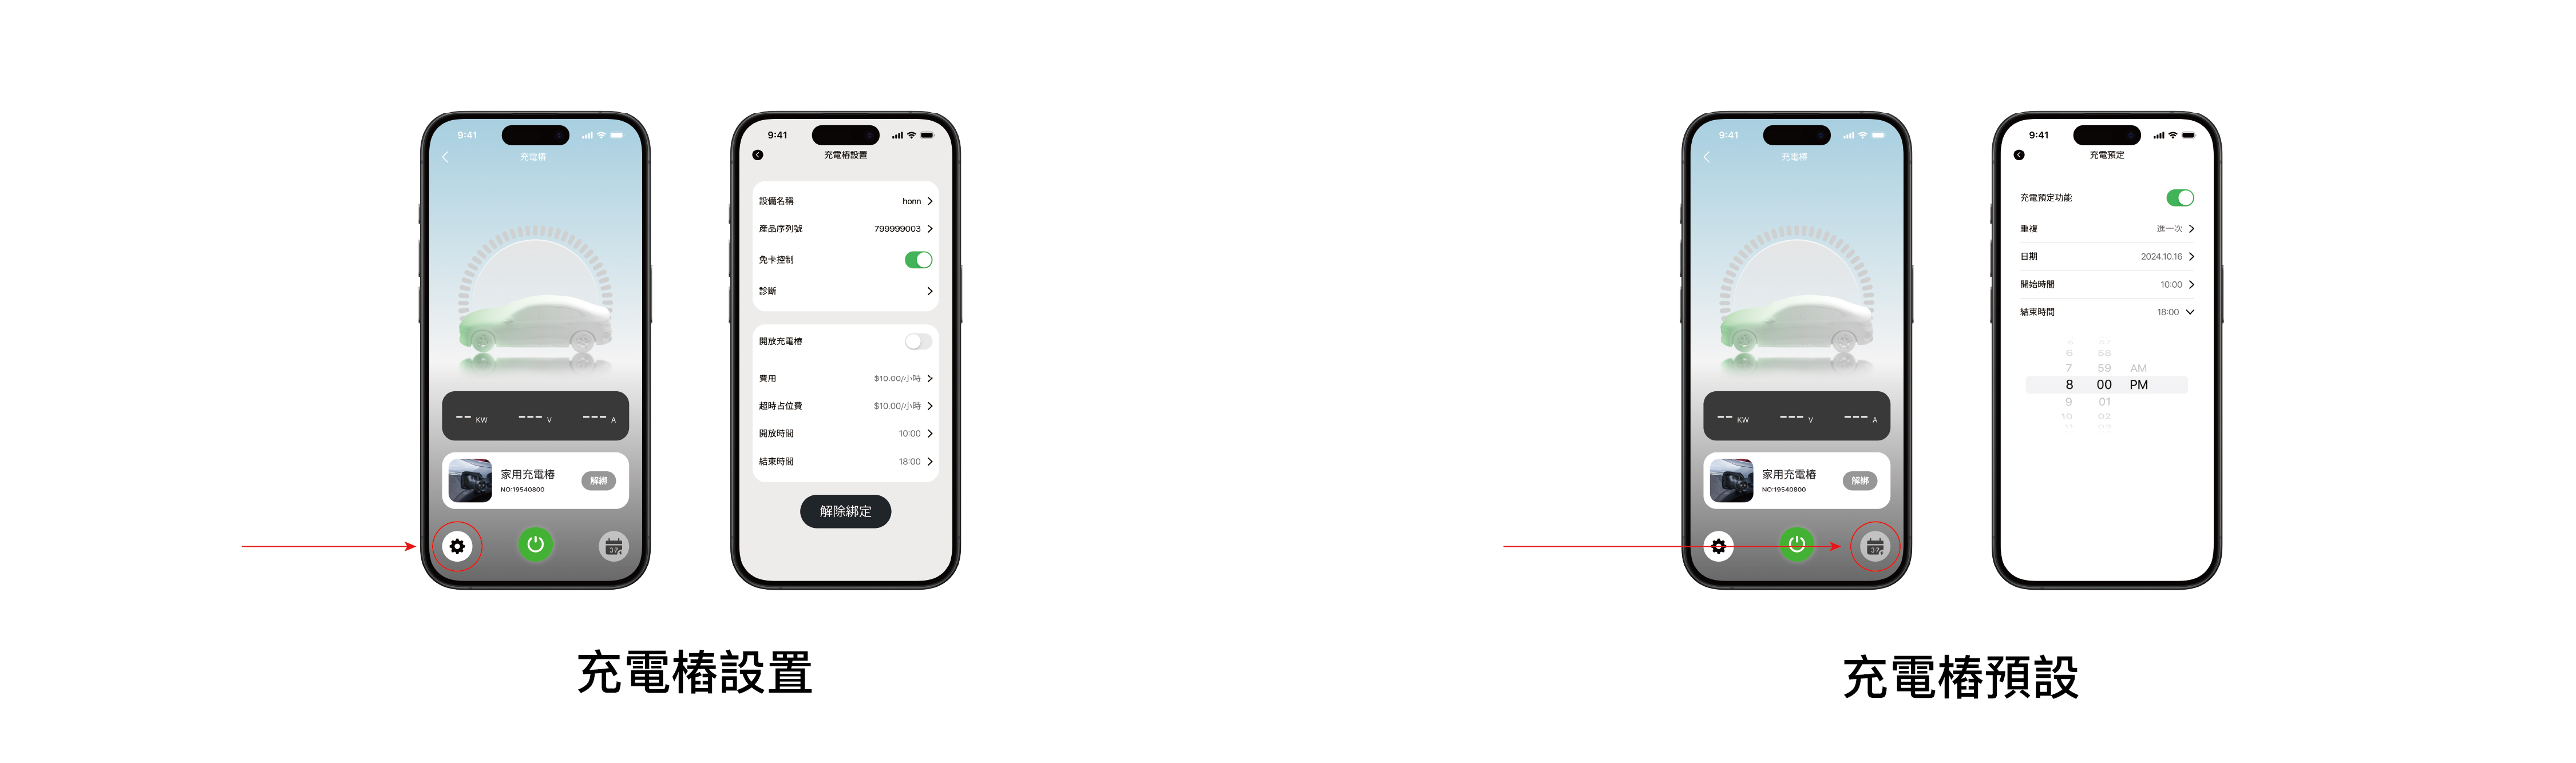
Click the setting icon on the left side to access the charging pile settings page. Click the calendar icon on the right side to enter the charging pile presets page.
05.Restore Factory Settings
In standby status, press the emergency stop button, then turn off and turn on the power again. At this time, the charging pile will emit an alarm sound until the alarm stops, then press the emergency stop button to complete the restoration of factory settings.
06.Usage Precautions
1. This product must be installed by qualified personnel trained to operate electrical systems. The input air switch must be selected to be greater than 1.5 times the rated current of the device, and the power ground line must be reliably grounded.
2. During use, strictly follow the design parameters and usage conditions, do not exceed the thresholds in this user manual, otherwise, it may damage the device.
3. Please do not change the specifications of electrical components, do not modify internal circuits or connect other circuits.
4. After properly installing the charging pile, if the device does not start normally after being powered on, please check whether the power connection is correct.
5. The device has limited dust and waterproof capabilities, pay attention to anti-static, moisture-proof, and waterproof during use. If the device has been soaked, immediately cut off the power and stop using it.
6. Please do not plug and unplug the charging gun during the charging process to avoid irreversible damage to the charging pile and vehicle.
07.warranty regulations
1. This product provides a one-year free warranty service from the date of purchase. (Except for damage caused by human factors)
2. Please read the product manual carefully before use to avoid improper operation.
3. Damage due to improper use, product beyond warranty period, human and natural wear, etc., is not covered by the free warranty scope. The company will charge repair fees at its discretion for such repairs.
4. Contact method: support@honnmono.com.hk

